What Changed in Agentforce Builder?
Spring '26 brings a major overhaul to the Agentforce development experience. The previous Agent Builder lived inside Setup and followed a form-filling pattern: pick a Topic, add Actions, write Instructions. The new Agentforce Builder is a standalone application (accessed via App Launcher under Agentforce Studio) that replaces form-based configuration with a dual-mode interface: visual orchestration and code editing.
Three core changes stand out:
- Canvas View: A visual drag-and-drop interface that renders agent logic as collapsible blocks
- Script View: A code editor for writing Agent Script directly
- Agent Script: A brand-new domain-specific language (DSL) that blends natural language prompts with deterministic logic
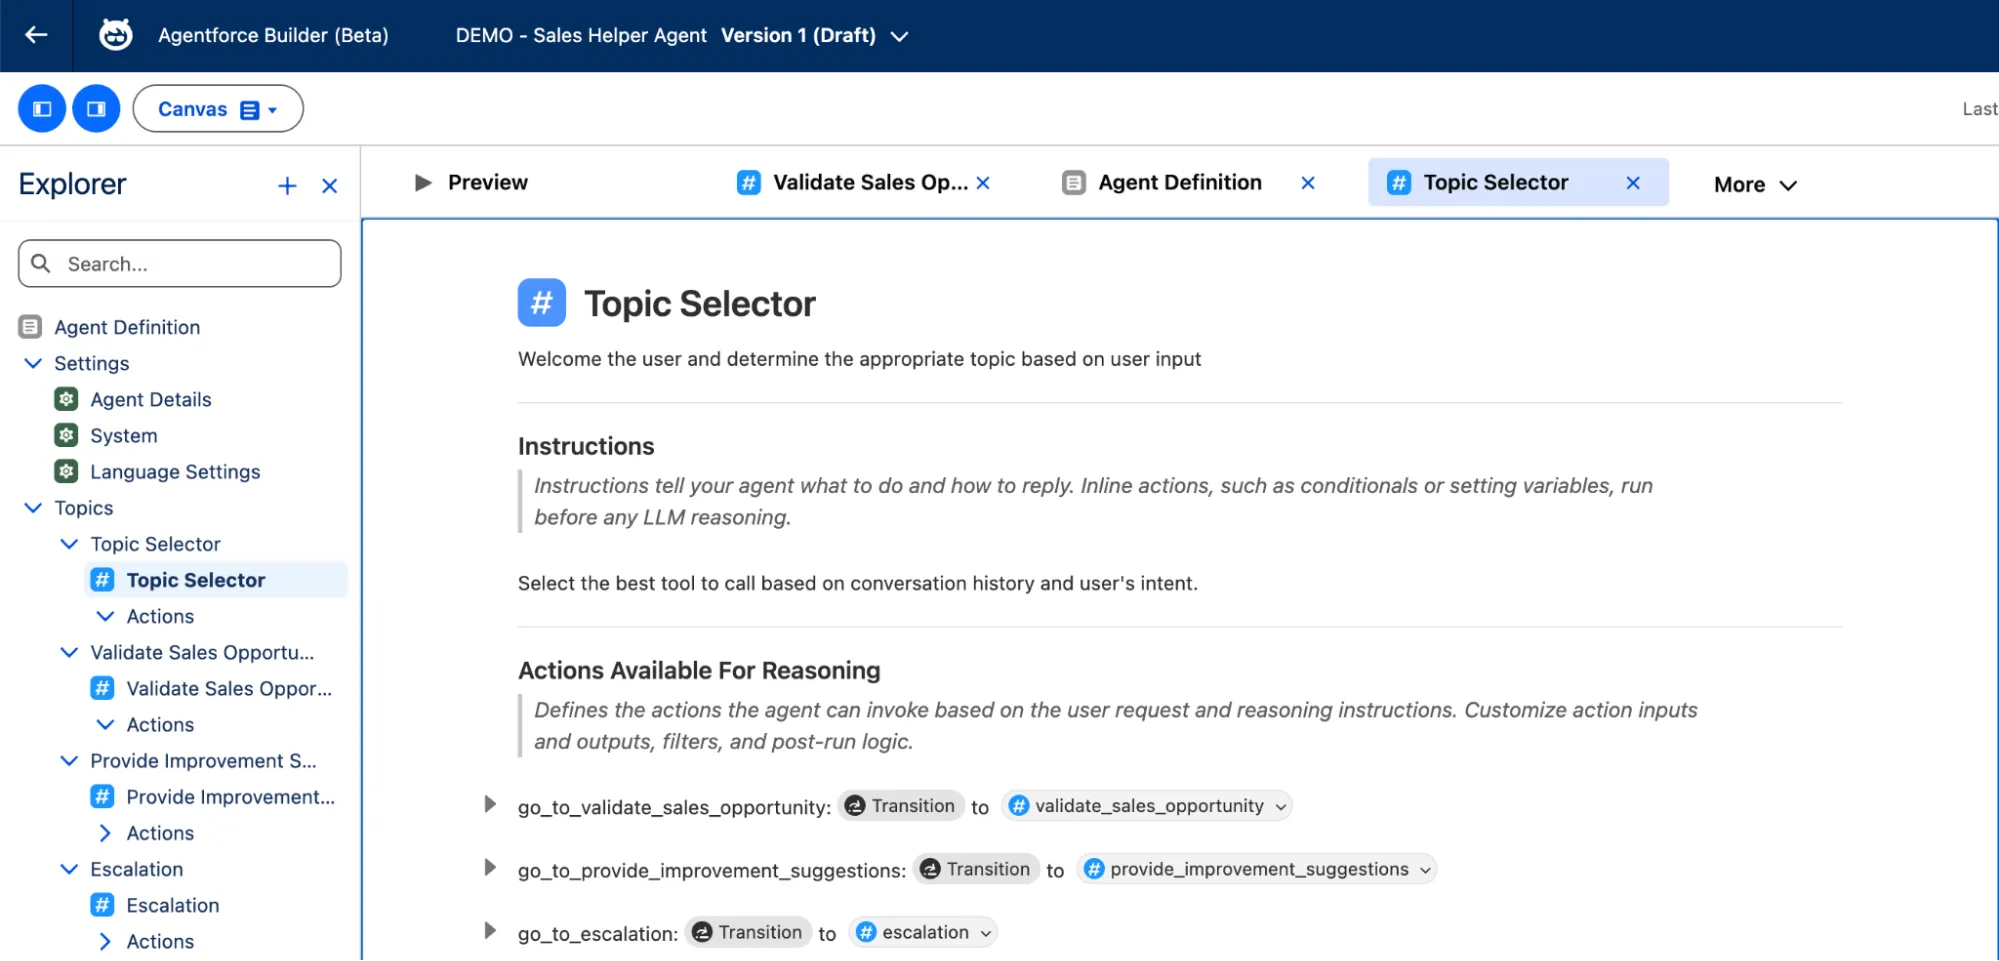
Let's take the same Sales Helper Agent's Topic Selector as an example to see how these two views differ.
Canvas View renders the Topic Selector logic as structured cards — Instructions appear as natural language text, and each Action is a collapsible Transition block:
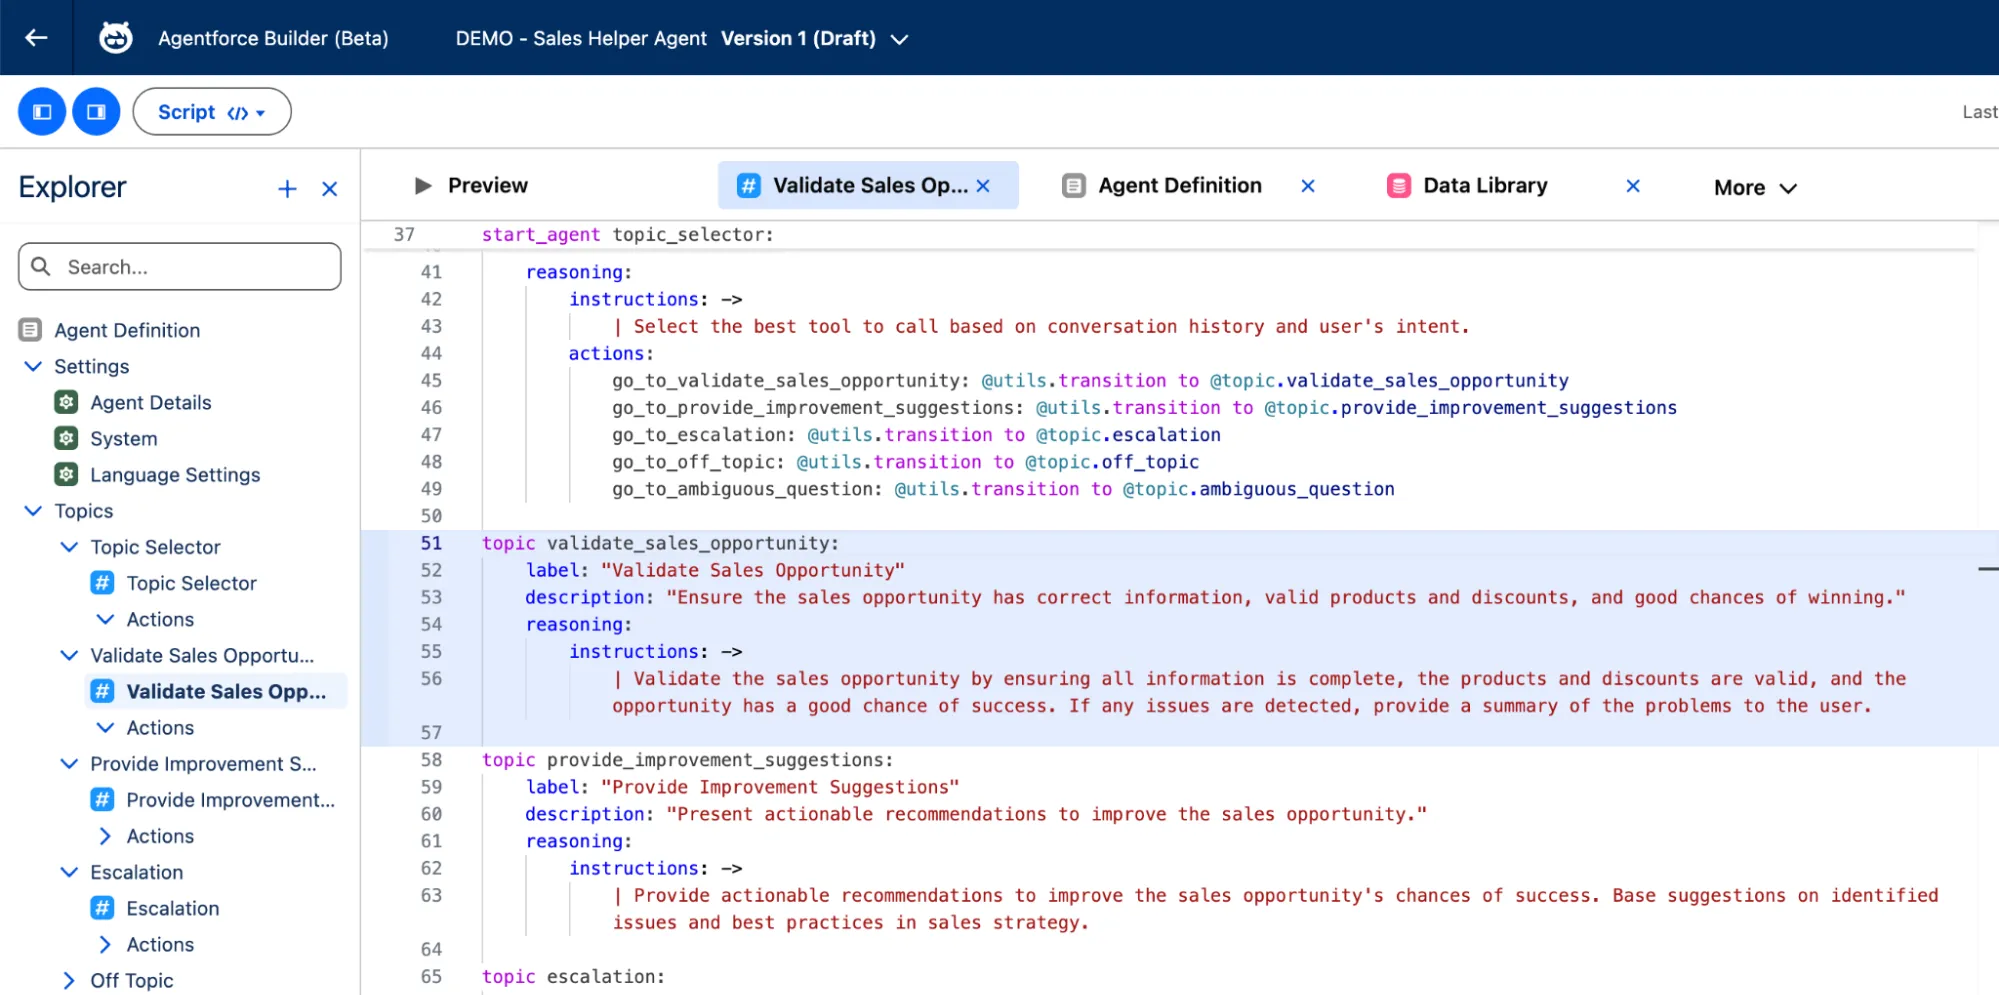
Switch to Script View, and the same logic becomes Agent Script code — start_agent defines reasoning.instructions and actions (multiple @utils.transition to @topic.xxx entries), followed by individual topic definitions:
The two views sync in real time — edit an Instruction in Canvas, and Script updates instantly; add a Topic in Script, and Canvas re-renders automatically. Let's walk through each of these three core changes in order.
Canvas View: Built for Non-Coders
Canvas View wraps the underlying Agent Script into visual blocks. Each block represents a piece of logic — a topic entry point, a set of conditionals, or an action call. You can expand any block to inspect the raw script, but most of the time you won't need to.
The screenshot below labels the 8 core areas of Agentforce Builder:
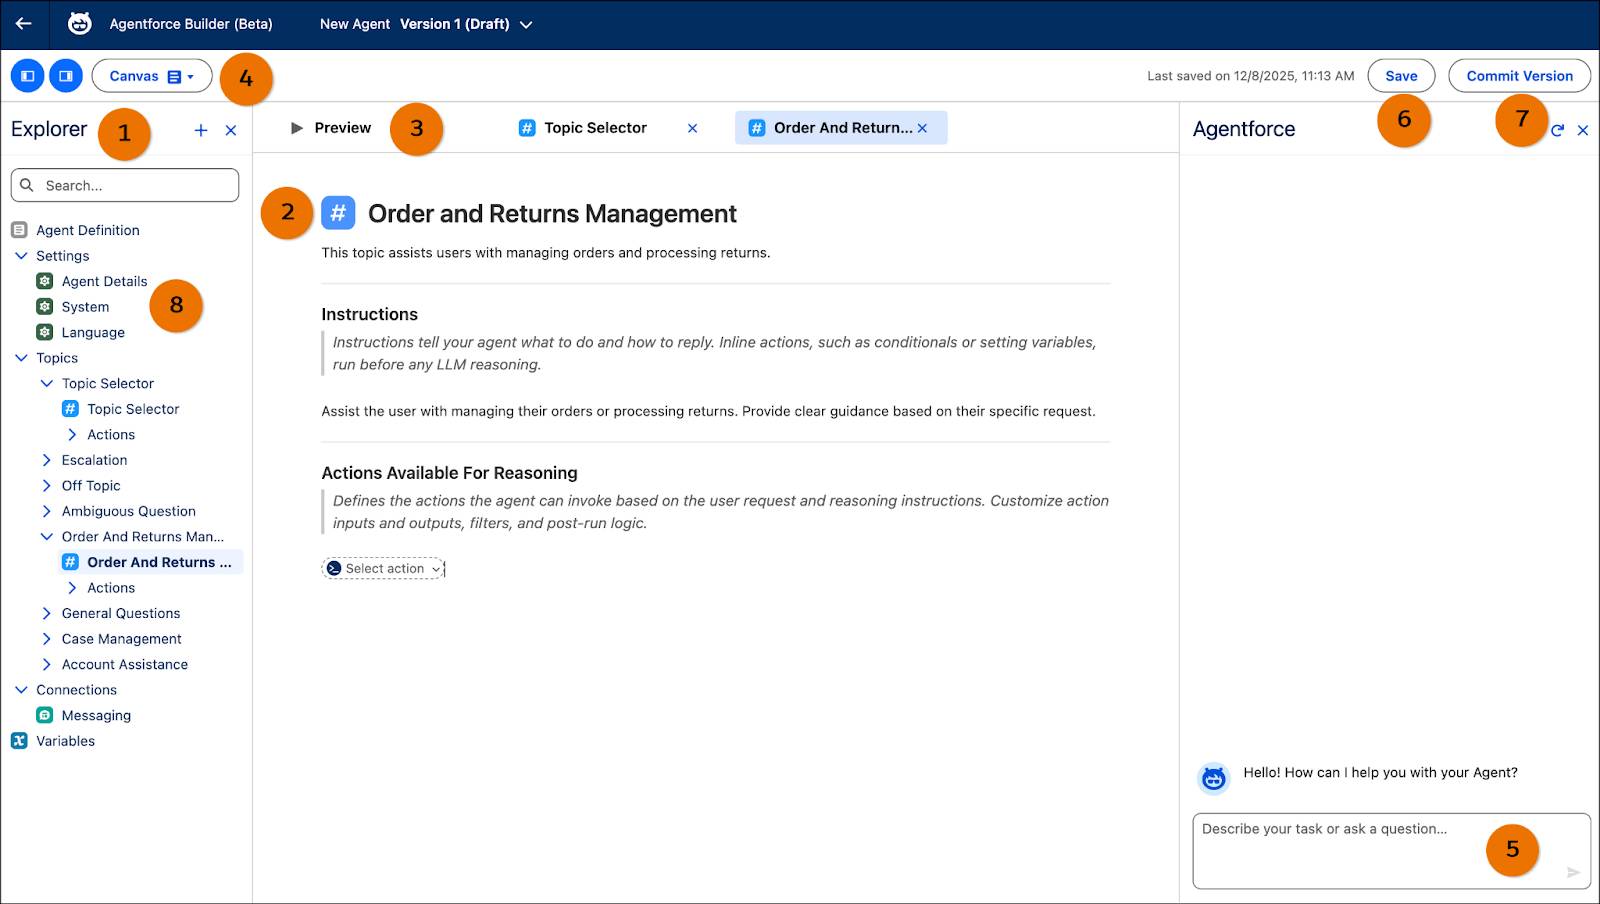
Here's what each labeled area does:
- Explorer: The agent's navigation tree, listing Agent Definition, Settings, all Topics (Topic Selector, Escalation, Off Topic, etc.), Connections, and Variables
- Topic Editor: The content editing area for the selected topic, including Instructions and Actions Available For Reasoning
- Tab Bar: Open multiple tabs simultaneously — Preview, Topic Selector, Order And Returns, etc. — for quick switching between editing panels
- Canvas / Script Toggle: Switch between Canvas View and Script View; edits in either mode sync in real time
- Agentforce Assistant Input: The AI assistant's chat entry point — describe your requirements in natural language and the assistant generates or modifies agent configuration for you
- Save: Save your current draft
- Commit Version: Commit the current draft as an official version — conceptually similar to a Git commit
- Settings: Global agent settings including Agent Details (name, description), System (system instructions, welcome message, error message), and Language configuration
Two keyboard shortcuts worth remembering:
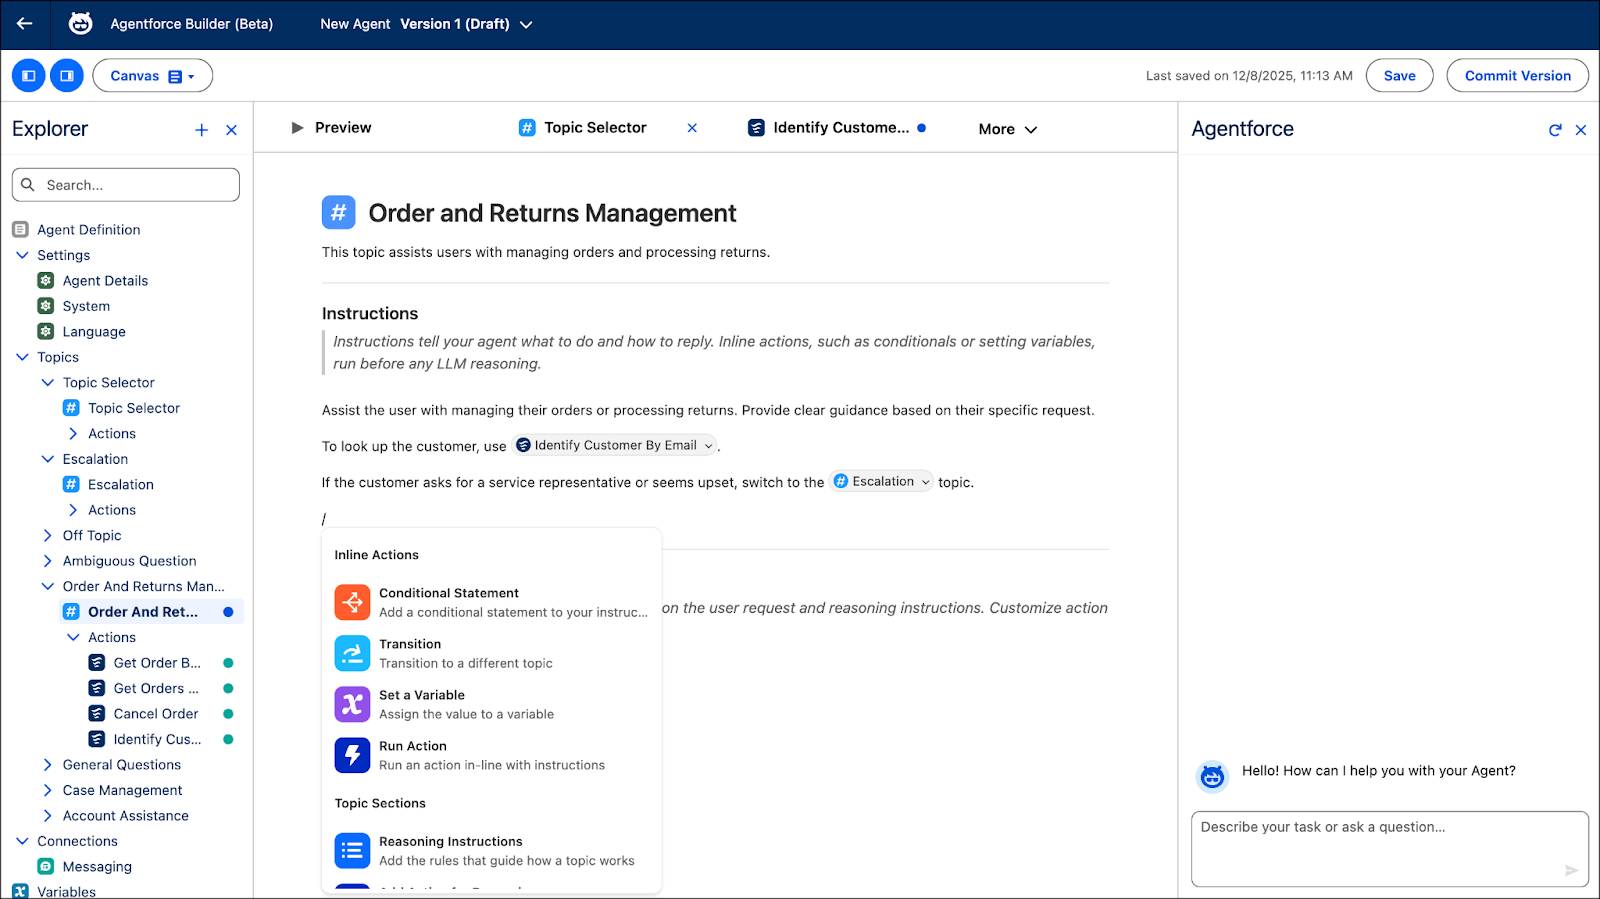
- Type
/to insert Inline Actions — Conditional Statement, Transition, Set a Variable, and Run Action - Type
@to reference resources such as@topic.order_management,@actions.get_order, or@variables.customer_id
The screenshot below shows Canvas View editing an Order and Returns Management topic, with the / Inline Actions shortcut menu open:
An AI assistant panel (Agentforce Assistant) sits on the right side. Describe what you want in plain English — "offer free shipping when the order exceeds $100" — and the assistant generates the corresponding Topics, Actions, and Instructions for you to review and accept.
For admins, Canvas View handles roughly 80% of agent-building scenarios. But once you need complex conditional nesting or multi-variable state management, Script View is where you'll want to be.
Script View: The Developer's Home Turf
Script View is a code editor with syntax highlighting, autocompletion, and real-time validation. For developers accustomed to writing code, editing Agent Script here is significantly faster than dragging blocks around in Canvas. The screenshot below shows the Agentforce Builder in Script View — the Explorer panel on the left remains unchanged, while the code editor on the right displays the raw Agent Script source with start_agent, topic_selector, individual topic definitions, and reasoning.instructions:
Key advantages of Script View:
- Copy-paste code snippets to reuse logic across multiple agents
- More detailed error messages for faster debugging
- Bulk editing support — modify instructions across multiple topics in one session
For teams building agents collaboratively, Agentforce DX extends Script View into a full local development workflow. It integrates with Salesforce CLI and the VS Code extension to pull agent configurations into local projects (sf agent generate), deploy to orgs via sf project deploy, and plug into Git version control and CI/CD pipelines. This is particularly valuable for enterprise projects with multiple contributors — agent configurations can go through code reviews, approval workflows, and change tracking, none of which are possible in the web UI alone.
Agent Script Syntax Breakdown
Agent Script is the centerpiece of this update. It's not a general-purpose programming language — it's a DSL for building AI agents (stored in .agent files). Its defining feature is Hybrid Reasoning: within the same instruction block, you can write deterministic program logic (conditionals, variable assignment) alongside natural language prompts for the LLM.
The screenshot below shows a Weather Assistant agent script open in VS Code — the Outline panel on the left reveals the full agent structure tree (config, system, variables, multiple topic blocks), while the code editor on the right shows Agent Script's syntax highlighting and indentation style:

File Structure
An Agent Script file follows a fixed block order:
config:
   agent_name: order_support_agent

variables:
   is_verified:
      mutable: True
      default: False
   customer_email:
      mutable: True
      default: None

system:
   instructions:
      | You are a helpful order support agent.
   welcome:
      | Hi! How can I help you with your order today?
   error:
      | Sorry, something went wrong. Let me try again.

start_agent:
   description: "Routes customer requests to the right topic"
   reasoning:
      actions:
         go_to_identity:
            description: "Verify customer identity"
            target: @topic.identity_verification
         go_to_orders:
            description: "Look up order information"
            target: @topic.order_management
            available when @variables.is_verified == True
Key syntax points:
- Indentation-sensitive: Uses 3-space indentation (not tabs), similar to Python
|(pipe): Marks natural language text that gets assembled into the LLM prompt@prefix: References agent resources —@variables,@actions,@topic,@outputs,@utils{! }template expressions: Inject variable values into prompt text at runtime
Hybrid Reasoning in Practice
This is the most compelling part of Agent Script. Inside a reasoning.instructions block, deterministic logic and LLM prompts coexist freely:
reasoning:
   instructions:
      -> if @variables.is_verified == False:
            transition to @topic.identity_verification
      | The customer is verified. Help them with their order.
      | If they ask about order status, use the lookup tool.
      -> if @variables.order_total > 100:
            | Offer free shipping as a courtesy.
Lines prefixed with -> are deterministic — they execute top-to-bottom without LLM involvement. Lines prefixed with | are prompt text that gets concatenated into a single prompt sent to the LLM. The key insight: only prompt text whose surrounding conditions evaluate to true gets included in the final prompt. This lets you dynamically tailor the LLM's instructions based on runtime context.
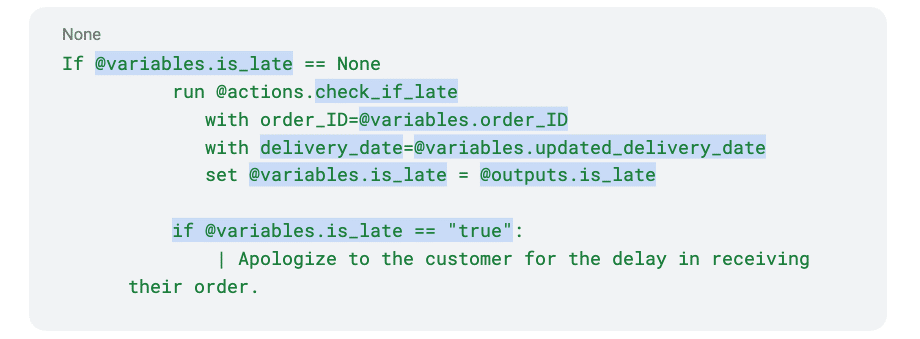
The screenshot below is from an actual Builder environment, showing hybrid reasoning in a real scenario — checking if @variables.is_late is null, deterministically running the check_if_late action and capturing the result, then conditionally instructing the LLM via | pipe to apologize for the delay:
Runtime Execution Flow
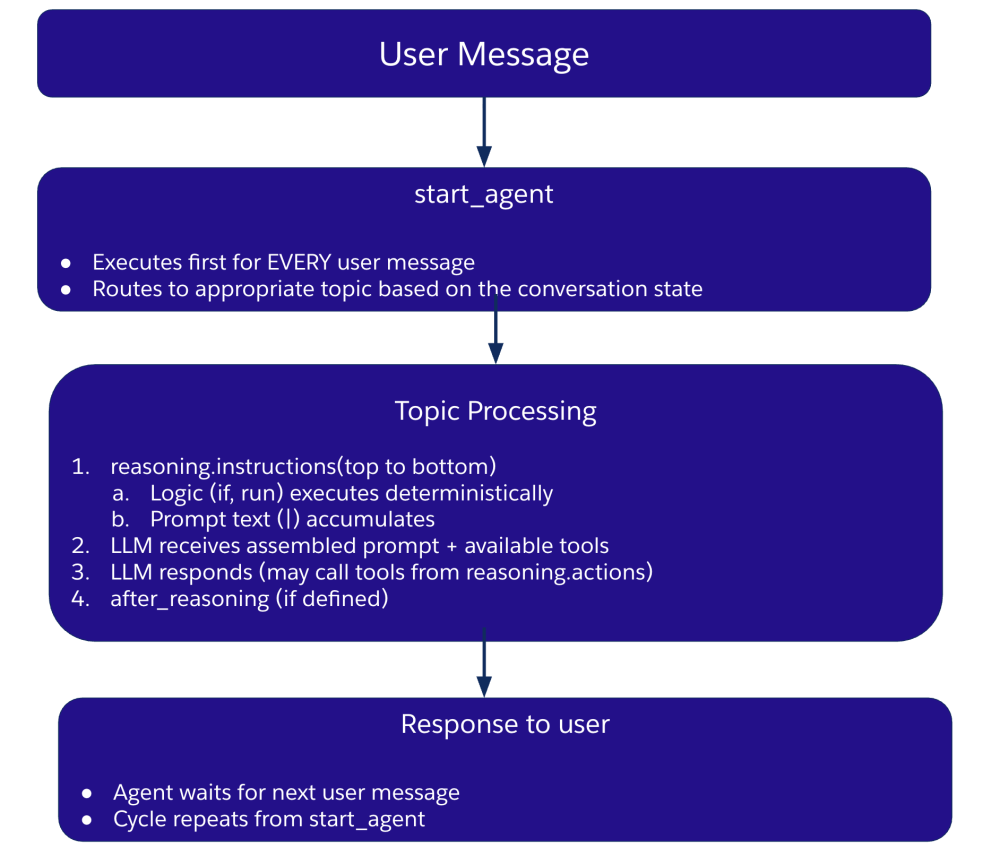
Every user message enters at start_agent, which routes to the appropriate topic. Inside Topic Processing, reasoning.instructions executes top-to-bottom — deterministic logic (if, run) fires immediately while prompt text (|) accumulates line by line. The LLM then receives the assembled prompt along with available tools from reasoning.actions and generates a response. Finally, after_reasoning runs any post-LLM deterministic cleanup. The cycle resets to start_agent when the next user message arrives:
Two Ways to Invoke Actions
Agent Script provides two distinct action invocation modes:
Deterministic execution (run) — bypasses the LLM entirely:
-> run @actions.get_order with (order_id: @variables.order_id)
   set order_data = result
LLM tool call (reasoning.actions) — the LLM decides whether to invoke:
reasoning:
   actions:
      lookup_order:
         description: "Retrieves order details by order ID"
         target: @actions.get_order
         inputs:
            order_id: ...
         set order_data = result
The ... (ellipsis) syntax tells the LLM to extract parameter values from the conversation context. The rule of thumb: use run for business rules (e.g., "after verification, always fetch the account"), use LLM tools for intent-driven actions (e.g., the user says "check my order").
Topic Transitions
Topic transitions also come in two flavors:
- LLM-selected: Use
@utils.transition toinsidereasoning.actions— the LLM decides whether to transition based on conversation context - Deterministic: Use bare
transition toinsidereasoning.instructionsorafter_reasoning— fires immediately when the condition is met
These two syntaxes cannot be mixed — @utils.transition only works in reasoning.actions, and bare transition to only works in reasoning.instructions or after_reasoning. Using the wrong one in the wrong place throws an error.
Variable System
Agent Script variables come in two types:
- Mutable: Read-write, can be modified during agent execution
- Linked: Read-only, pulled from external context (e.g., chat session data)
variables:
   is_verified:
      mutable: True
      default: False
   customer_name:
      mutable: True
      default: None
   channel:
      linked: True
      source: "session.channel"
Boolean values must be capitalized — True / False, not true / false. This trips up quite a few developers. Variable assignment uses set, while extracting values from LLM conversation uses @utils.setVariables.
after_reasoning: Post-LLM Deterministic Hook
Each topic can define an after_reasoning block that runs after the LLM generates its response. Only deterministic logic is allowed here. Common use cases include:
- Setting variables based on the LLM's response
- Forcing a transition to the next topic (e.g., after verification passes, always enter order management)
- Logging or triggering downstream processes
after_reasoning:
   -> if @variables.verification_passed == True:
         transition to @topic.order_management
This design pattern ensures that "the LLM can converse freely, but what happens next is dictated by business rules."
Preview and Debugging
Agentforce Builder includes a built-in Conversation Preview panel for testing agents with mock data. After running a conversation, you get Interaction Details that trace every step of the reasoning chain:
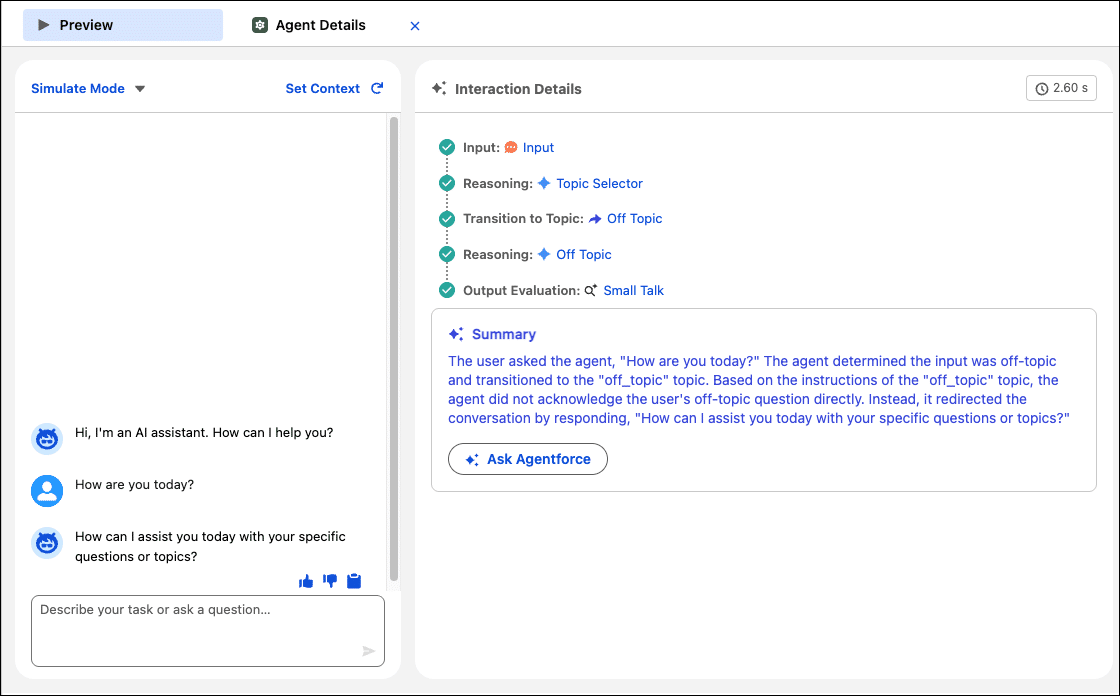
The screenshot above demonstrates a typical debugging scenario: the user sends "How are you today?", and the agent's reasoning chain shows Input → Reasoning (Topic Selector classifies it as small talk) → Transition to Off Topic → Reasoning (Off Topic handling) → Output Evaluation (Small Talk). Instead of engaging in casual chat, the agent redirects the user back to business topics. The Summary section at the bottom explains the entire decision process in natural language.
Spring '26 also enhances agent tracing — every message now carries detailed reasoning traces, which is invaluable for diagnosing "why did the agent make that decision."
Where It Fits — and Where It Doesn't
Agentforce Builder + Agent Script is ideal for building conversational agents with well-defined business processes: customer service (identity verification → issue classification → ticket handling), order management (lookup → modification → refund), internal IT support (permission request → approval → execution).
Current limitations are worth noting:
- Agent Script is still in Beta — syntax may change
else ifis not supported; complex conditions require nestedifblocks- Expressions don't support multiplication, division, or modulo operations
- A known quirk: the last line of Agent Script in Builder sometimes throws unexpected errors — the official workaround is to add a blank line or comment at the end
- The legacy Agent Builder and the new Builder coexist with no announced retirement date for the old version
If you're new to Agentforce, start with the official Agentforce Builder Workshop. It walks you through a virtual food delivery company (Pronto) scenario covering agent creation, topic configuration, identity verification, and external API integration — a solid way to understand how Canvas View and Agent Script work together in practice.